
Module Manager
Introduction
Module Manager is a tool to create New Modules, Edit Modules by Adding & Editing Fields/Columns and Manage them with Role Access Control. Inspired by Philosophy of SugarCRM it has completely Modular Approach and support fields with advanced data types. Once you are done editing Module You can generate CRUD's simply clicking a Button.
Using Module Manager
You can open Module Manager by Modules Option shown in Top Navbar or by url /admin/modules
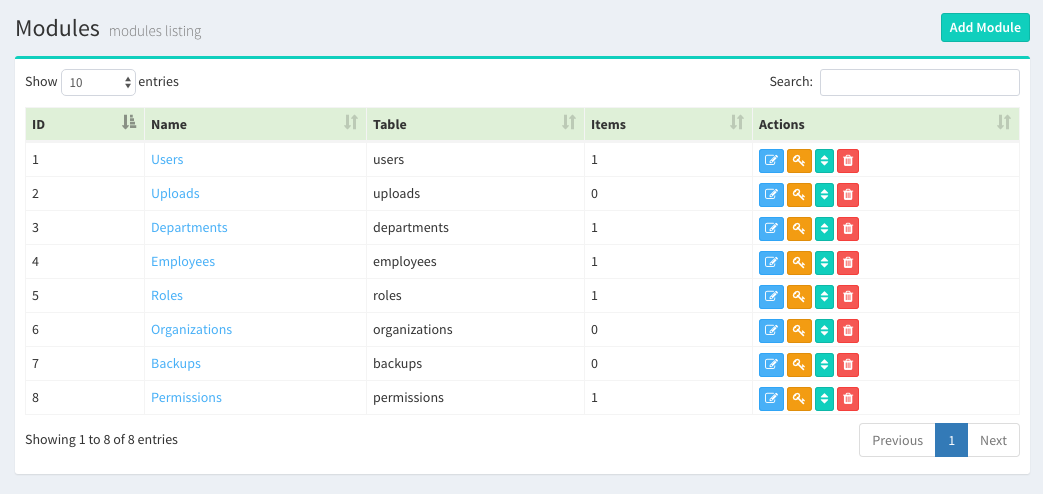
Once you open Module Manager you will see all the system Modules Listed there. In actions you will see option to
- Edit Module - Edit Module Fields
- Module Access Control - Module & Module Field Access for Roles
- Module Field Sorting - Sort Module Fields for Form Views
- Module Deletion - Deletes Database + CRUD's
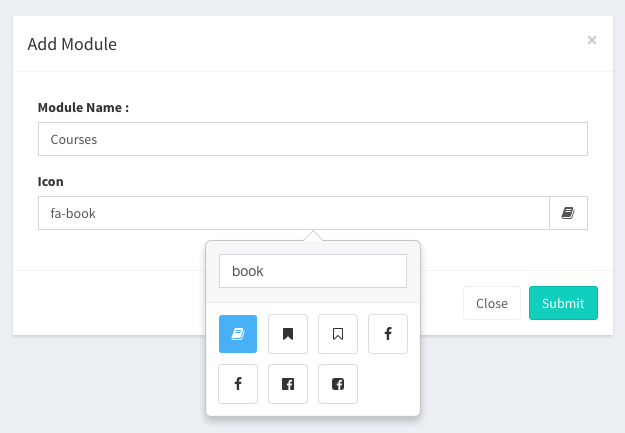
Create a Module
You can simply create a Module with its Name and Icon. You can choose Module name One word or Multi Word. We recommend to choose Module name as Noun and should be Plural. e.g. Courses, System Handlers, User Orders. It is because we use Laravel function like str_plural, str_singular to generate Controller, Model and Database Table names.
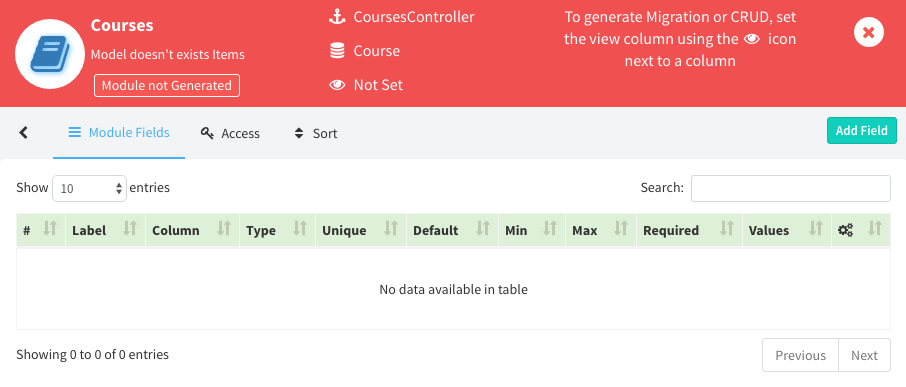
Once you created a Module it will not create a actual table but a Schema in modules table. When you create first field of Module then the module table will be created.
Icon represent the View Column which will be used as anchor in Course Listing to view Detailed Course Info. Without setting this you cannot generate the Module. Module Header show Red Background because CRUD's not generated for this Module.
Things to know:
- LaraAdmin uses two database tables to manage the Module Schema:
moduleswhich stores information about module such as database name, controller name, icon andmodule_fieldswhich stores schema for fields. Please have look at them once. -
LaraAdmin is divided into two parts for its working:
- Part of code which comes in your project (UI + Built-in Modules) after
la:install - Remaining code (Business Logic) which lies in
dwij/laraadminpackage which will be there in/vendor/dwij/laraadmin
- Part of code which comes in your project (UI + Built-in Modules) after
- Check more about How LaraAdmin works ? in Architecture section.
Add Module Fields
Next step is to create Module Fields. The first Module Field should be a Name / Title.
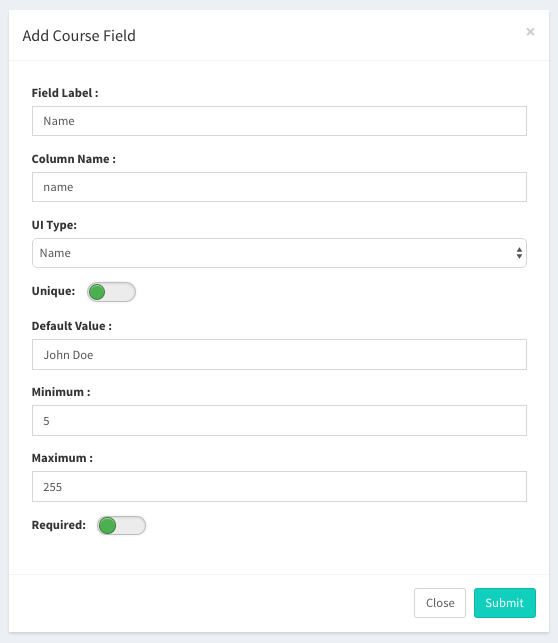
| Field Label | Label of Column e.g. Name, Cost, Is Public |
| Column Name | Database column name. lowercase, words concatenated by underscore (_) |
| UI Type | It defines type of Column in more General way. Please see table for UI Types. |
| Unique | Whether the column has unique values. Value in true / false |
| Default Value | Default value for column. |
| Minimum | Minimum Length of value in integer. |
| Maximum | Maximum Length of value in integer. |
| Required | Is this mandatory field in Add / Edit forms. Value in true / false |
| Values |
This is for MultiSelect, TagInput and Radio Columns. Firstly you need to decide whether you want to give values manually in List or from Database Tables.
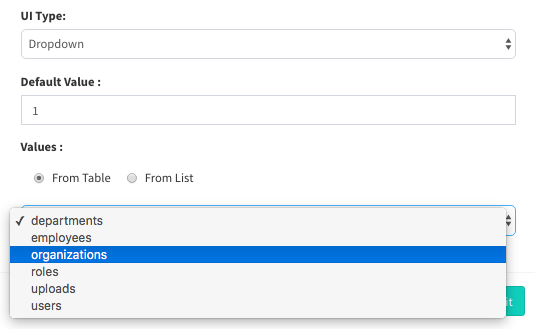
Popup Values from Database tables with foreign keys. Here Default value should be integer. 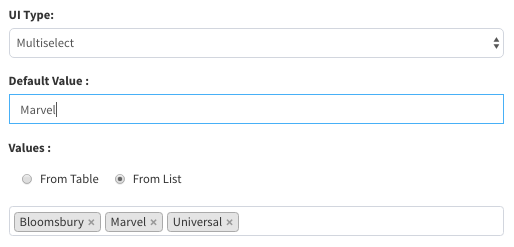
Popup Values from Editable List. Here Default value should be blank or value from Values List. |
UI / Data Types
There are around 24 Data Types supported as of now. There will be more in future.
| Data Type | Default Value | Minimum | Maximum | Popup Values |
|---|---|---|---|---|
| Address | In String | Integer | Integer | |
| Checkbox | true / false | 0 | 0 | |
| Currency | In Decimal | Minimum Value | Maximum Value | |
| Date | now() 2016-06-23 | 0 | 0 | |
| Datetime | now() 2016-06-23 14:20:90 | 0 | 0 | |
| Decimal | In Decimal | Minimum Value | Maximum Value | |
| Dropdown | String | - | - | [ Array List ] |
| Integer | @ Database Table | |||
| In String | Integer | Integer | ||
| File | File Path (String) | 0 | 256 | |
| Float | In Float | Minimum Value | Maximum Value | |
| HTML | In String | 0 | 0 | |
| Image | Image Path (String) | 0 | 256 | |
| Integer | In Integer | Minimum Value | Maximum Value | |
| Mobile | In String | 0 | 20 | |
| Multiselect | String | - | Max Selections | [ Array List ] |
| Integer | @ Database Table | |||
| Name | In String | 5 | 256 | |
| Password | In String | 6 | 256 | |
| Radio | String | - | - | [ Array List ] |
| Integer | @ Database Table | |||
| String | In String | 0 Integer | 256 Integer | |
| Taginput | [ Array List ] | Min Selections | Max Selections | [ Array List ] |
| @ Database Table | ||||
| Textarea | In String | 0 Integer | 1000 Integer | |
| TextField | In String | 5 Integer | 256 Integer | |
| URL | In String | 0 | Default 256 |
Generate CRUD's
Once you created all fields, you need to select View Column using icon in front of desired column. Most probably Name or Title. Once you do that you can generate CRUD's just by clicking button Generate Migration + CRUD. After this you can see Module background to be Green.
Generated CRUD's:
- Controller - CoursesController.php
- Resource Routes for CoursesController in admin_routes.php
- Model - Course.php
- Migration - create_courses_table for migration purpose
- Views - index.blade.php, edit.blade.php, show.blade.php
Things to know:
- Your db table
courseswas generated and manipulated simultaneously when you created first fieldName. - Once CRUD's are generated you can directly access it from
/admin/courses. But in Laravel testing mode you need another request to access it asadmin_routes.phphas to be loaded again with new routes we added programmatically.
Edit Module Fields
LaraAdmin provides dynamic Field editing which doesn't need migrations to be refreshed. You can simply click on Edit Field button and start editing field.
You can also change field types such as Dropdown, Multiselect, Radio, Taginput which are connected to other modules / tables via foreign keys. LaraAdmin will automatically call $table->dropForeign and easily switches linked tables.
Once you are done with all editing you can get your migration file updated via Update Migration button on Module page. This will help you create the exact table again in next installation.
Is this content useful ?